In the intricate world of computer hardware, every component plays a crucial role in ensuring optimal functionality. Motherboards, the central nervous system of a computer, require careful installation to guarantee stability and performance. One often-overlooked component that plays a vital role in this process is the motherboard standoff. In this comprehensive guide, we’ll delve into the nuances of motherboard standoffs, addressing key questions such as what they are, how to install them, their types, and why they are essential for your computer’s health.
What Are Motherboard Standoffs?
Motherboard standoffs are small pillars typically made of brass or other conductive materials. These standoffs are installed between the motherboard and the case, creating a gap that prevents the motherboard from directly touching the metal surface of the case. This separation is crucial to avoid electrical shorts that could damage the motherboard or other components.
How to Install Motherboard Standoffs: A Step-by-Step Guide
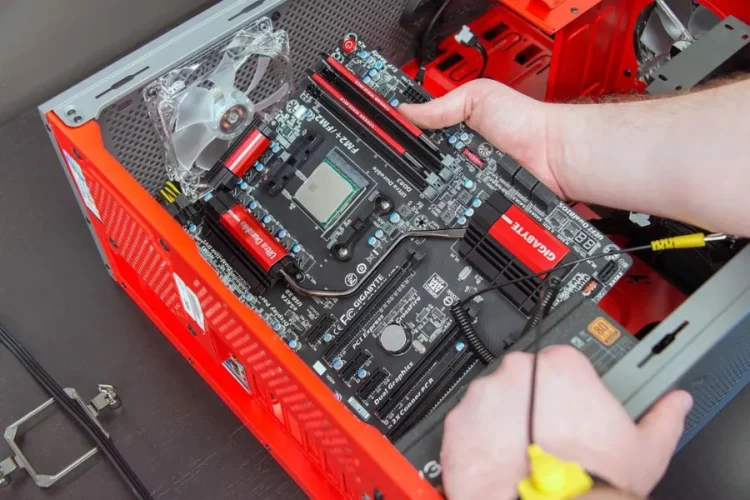
Installing motherboard standoffs is a relatively simple process, but it requires precision to ensure a secure fit. Here’s a step-by-step guide on how to install motherboard standoffs:
- Identify the Standoff Locations: Check your computer case for pre-drilled holes where the motherboard standoffs should be installed. These holes typically align with the mounting holes on your motherboard.
- Place the Standoffs: Screw the standoffs into the pre-drilled holes, ensuring they are snug but not overly tightened. Use a standoff tool or pliers to get a firm grip without damaging the standoffs.
- Align the Motherboard: Once the standoffs are in place, carefully align your motherboard with the standoffs. Ensure that the screw holes on the motherboard match the positions of the standoffs.
- Secure the Motherboard: Use screws to secure the motherboard onto the standoffs. Start with the center screw to hold the motherboard in place, then proceed to secure the remaining screws.
- Double-Check the Alignment: Before tightening all screws, double-check that the motherboard is properly aligned with the standoffs. Make any necessary adjustments to ensure a perfect fit.

Do I Need Motherboard Standoffs?
Yes, motherboard standoffs are essential components in any computer build. Without them, the motherboard would come into direct contact with the metal case, leading to potential short circuits. These shorts could damage the motherboard, rendering the entire system inoperable.
What Type of Motherboard Standoffs Are There?
Motherboard standoffs come in various shapes and sizes, but the most common type is the hexagonal standoff. These standoffs have a threaded end for screwing into the case and a raised, usually hexagonal, end that supports the motherboard.
Other types include round standoffs and those with a snap-in design. The choice of standoff type often depends on the computer case and personal preference. Some cases come with pre-installed standoffs, while others may require manual installation.
Do Motherboard Standoffs Come With Motherboards?
Motherboards typically do not come with standoffs. Instead, standoffs are usually included with the computer case. It’s essential to check the case’s accessories or packaging to ensure that you have the required standoffs before starting the motherboard installation.

What Happens if You Don’t Use Motherboard Standoffs?
Failure to use motherboard standoffs can lead to severe consequences for your computer. When the motherboard comes into direct contact with the metal case, electrical shorts are likely to occur. These shorts can damage the motherboard, other connected components, or even result in a fire hazard.
In addition to the risk of damage, the absence of standoffs compromises the structural integrity of the motherboard. Vibrations and movement within the case can cause the motherboard to flex, leading to long-term damage and potential failure.
How Do You Remove Motherboard Standoffs?
Removing motherboard standoffs is a straightforward process if done carefully. Follow these steps:
- Identify the Standoff to Remove: Determine which standoff needs to be removed. Use a flashlight if necessary to get a clear view inside the case.
- Use the Right Tool: A standoff tool or pliers specifically designed for this purpose will make the job easier. If these tools are not available, carefully use pliers, ensuring not to damage the motherboard or case.
- Turn Counterclockwise: Place the tool around the standoff and turn counterclockwise to loosen it. Once it’s loose, you can unscrew it by hand.
- Remove the Standoff: Once the standoff is fully unscrewed, carefully lift it out of the case. Ensure that no loose screws or debris remain in the case.
- Inspect for Damage: After removal, inspect the threads of the standoff and the hole in the case. If either is damaged, replace the standoff or use a different hole.
In most cases, it’s recommended to use the same type of standoffs provided with the case to ensure a proper fit. Mixing different types may result in an uneven motherboard installation.
Plastic standoffs are not recommended, as they lack the conductivity of metal standoffs. Metal standoffs are essential for grounding the motherboard and preventing static buildup.
Yes, you can reuse standoffs if they are in good condition and compatible with your new case and motherboard. Check for any signs of wear or damage before reuse.
The number of standoffs required depends on the size of your motherboard. Most ATX motherboards require nine standoffs, while microATX may need six. Refer to your motherboard and case manuals for specific requirements.
Purchase additional standoffs that match the specifications of your case. It’s crucial to have the correct number and type of standoffs to ensure a secure and stable motherboard installation.
Understanding and correctly installing motherboard standoffs is a fundamental aspect of any computer build. Neglecting this small but crucial component can lead to severe consequences for your system’s functionality and longevity. By following the guidelines provided in this comprehensive guide, you ensure a secure and stable motherboard installation, paving the way for a reliable and high-performance computing experience.
Conclusion:

